

Skill points and levels are two counters, and different sources cover each
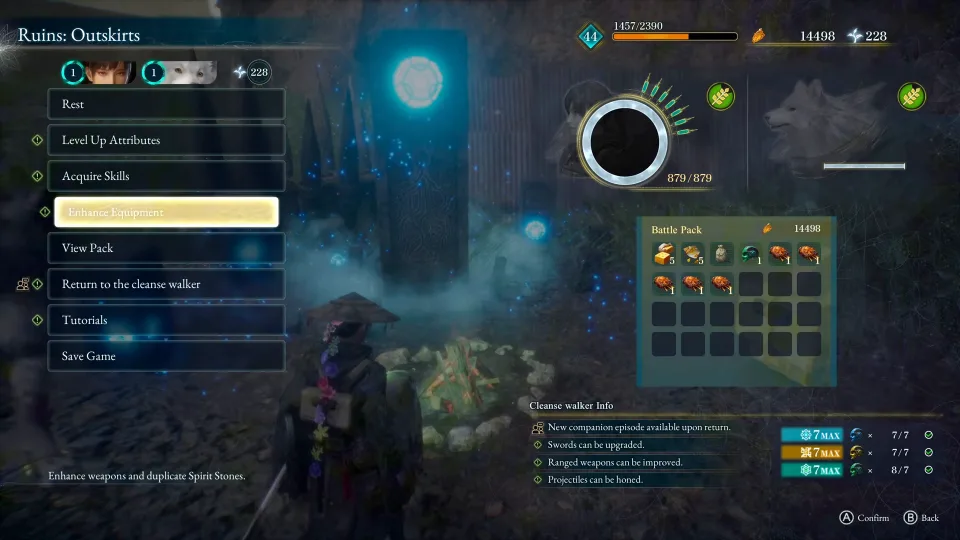
The campfire menu keeps “Level Up Attributes” and “Acquire Skills” as two separate entries, and the HUD counts them separately too: a character level with an experience bar on one side, and a skill-point total on the other. That split is why this page cites two different kinds of source. The three hands-on creator captures below describe kills dropping skill points — one per enemy, stated independently by each — and not one of them says what those kills do to the experience bar. The two Japanese wikis in the last section answer the other half, publishing experience per loop for named camps, and they are the only sources here that address levelling at all. Creator titles call all of it “levelling” and “XP”, so that is what people search; keep track of which counter a given figure below is about, because no source on this page measures both.
One loop, three camps, and only the loop is corroborated
Rest at a campfire, the enemies around it come back, kill them again. That is the whole mechanic, and three creators reached it independently in the same launch week. Where they part company is the camp: one runs it at the very first campfire in the game, one at a named camp most of the way through, one in the second zone. Each presents his as the best. Nobody on this site has run a stopwatch on any of them, so the rates below are quoted with the creator attached and, where his own two figures do not reconcile, with the arithmetic problem left visible rather than tidied away.
What all three agree on
- Every enemy killed drops one skill point.BltzZ 00:00 · Graviton Gaming 01:00
- Resting at a campfire respawns the enemies around it, so the same few kills repeat indefinitely.BltzZ 01:00 · Graviton Gaming 00:30 · Arekkz Gaming 01:00 · BltzZ 06:00
- Skill costs are not flat, so the same farm feels fast early and slow late — one creator puts cheap nodes at eight to fifteen points and later single upgrades at eighty-eight.BltzZ 00:00
Where each creator ran it
When Mid-run. He is level 44 with 14,498 amber banked when he films it, so this is not an opening-hours option.
Rest, close the menu, and four enemies appear behind the campfire. He clears them with a crossbow, switching bolt type rather than reloading when a stack runs out, then rests again and they come back in the same places.
His own testing, stated on camera: about 50 skill points every two minutes, at four points per pass.
His two figures do not obviously reconcile. Fifty points at four per pass is twelve and a half passes, which would put a full rest-kill-rest cycle under ten seconds. Both numbers are his and both are published here rather than one being chosen; he also says the spawn is “slightly random every time” and invites better spots in his comments.
The loadout one of them built it around
Graviton Gaming’s, from the Ruins: Outskirts run. Reproduced because a farm is only as fast as the thing killing for it — not because this site has tested any of it. Three of these are attribute-gated and our sources already disagree about what the attributes do.
Spring Thunder Crossbow, damage enhancement maxedRead off the client
The weapon the whole loop runs on. Its Ranged Weapon Enhancement screen splits into two separate tracks, Damage Enhancement and Reload Speed, which is a level of detail /amber-upgrades/ did not have.
Enhanced Crossbow
Straight damage, so the kills land sooner.
Magic Bullet
Bolts hit the same target more than once.
Scatter Shot
Three projectiles per shot. He says it needs Vitality maxed to reach.
Homing Shots at level 5
Full tracking, so the loop does not need aiming.
Two fire-rate spirit stones
He states +50% fire rate from the pair.
Double-Edged Sword
Halves Emma’s health for +30% damage — a farm-only trade, and a bad one anywhere a boss can reach her.
Last Lightning
Shocked enemies discharge into whatever is next to them, which only pays when the spawn clumps.
Where the named one actually is
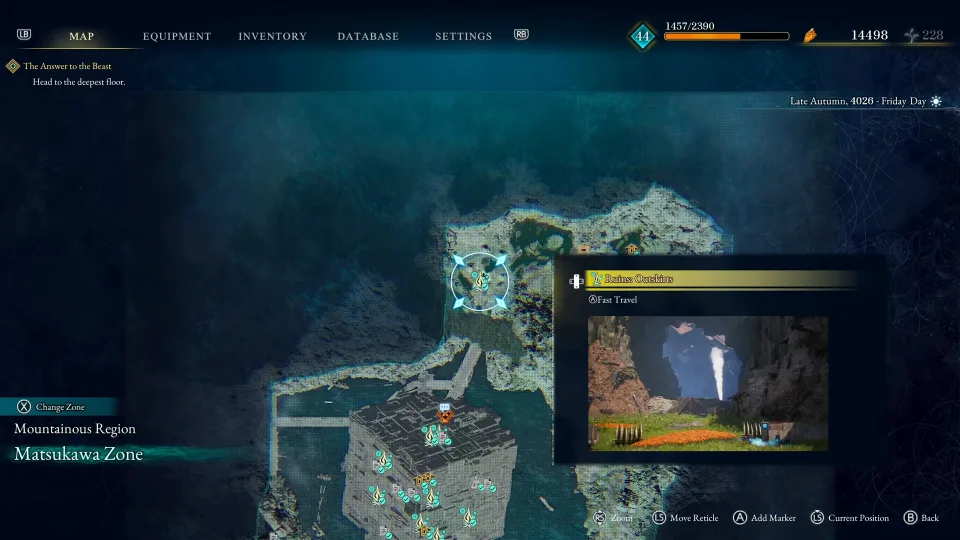
Only one of the three names its camp on screen, which makes it the only one a reader can navigate to without watching a video. The map screen puts it in the Matsukawa Zone of the Mountainous Region, with the fast-travel point labelled Ruins: Outskirts. Worth noting against the recording: the creator describes the camp as being at the top left of the zone, and the map frame shows the marker sitting north of the large ruin block rather than west of it. Go by the fast-travel name, not by the compass direction.
Amber is a separate problem, and the same loop does not solve it
Skill points buy nodes on the tree. Amber pays for weapon upgrades, projectile upgrades and the partial respec out of one shared pool, which is why respeccing to try a farm loadout costs more than it looks like it should. Neither farming source gives an amber-per-hour figure, and one of them is sitting on 14,498 amber while he films — a number that says he is past the wall rather than showing you how to get past it. What upgrading costs and where it happens is on /amber-upgrades/.
Two Japanese wikis put numbers on it, and they do not fully agree
Game8 and kamigame each publish a levelling route with experience and amber per loop for named camps — the figures no English source gives. They were written independently and they are not measurements: neither states a method, a sample size or a character level, and neither carries per-claim provenance. Both columns are printed below rather than averaged, because where they diverge the gap is the useful information. Camp names are left in Japanese. They are in-game strings and nobody here has read them in an English client, so an invented English name would match neither the game nor the sources; the regions beside them are this site’s established region names. Two things both wikis state independently and are worth more than any single figure: lowering the difficulty does not reduce the experience a kill awards, so the lowest setting is strictly faster for this purpose; and fast-travelling back to a camp does not respawn anything — only resting does.
- The Crater Zone loop is worth about eleven times the early camp per loop on both wikis’ own numbers, and it is the only row where they agree on experience and diverge on amber — by 2.5×. Nothing published explains the amber gap, so neither figure is preferred here.
- kamigame names the Crater Zone target as 枯れ死の獣 and says the same enemy appears in Episode 5 for much less experience; Game8 describes it only as a large boss-class enemy. It also warns that the second New Game+ run is locked to a higher difficulty, which is why it recommends levelling before starting one.
- Both note the same failure mode at the early camp: the golems can kill the deer before you reach them, and the deer’s experience is then lost. Kill order is the whole difference between the quoted figure and a worse one.
- These are competitor claims read on 2026-08-22 and graded as such. No figure in this table has been reproduced by this site, and the Game8 page was last edited the morning it was read — treat the numbers as current rather than settled.
| Camp | Region | When | Experience / loop | Amber / loop | Loop time |
|---|---|---|---|---|---|
| 崖底を望む塔 | Ogouchi Buffer Zone | Episode 1–3 | ~150 (both agree) | ~1,500 (both agree) | ~1 min (kamigame) / 1–2 min (Game8) |
| 花畑の塔前 | The Great Wall Terraces | mid-run | ~180 (Game8 only) | ~1,700 (Game8 only) | not stated |
| 洞の間内部 | Pilgrim’s Zone | Episode 4–7 | ~220 (Game8) / ~230 (kamigame) | ~1,500 (both agree) | ~45 s (kamigame) / under 1 min (Game8) |
| ヌシの巣前 | Mount Hiei Zone | late | ~230 (Game8 only) | ~3,000 (Game8 only) | not stated |
| クレーター周辺 | Crater Zone | Episode 8 onward | ~2,600 (both agree) | 375 (Game8) / ~150 (kamigame) | ~1–1.5 min (both) |
崖底を望む塔
- Region
- Ogouchi Buffer Zone
- When
- Episode 1–3
- Experience / loop
- ~150 (both agree)
- Amber / loop
- ~1,500 (both agree)
- Loop time
- ~1 min (kamigame) / 1–2 min (Game8)
花畑の塔前
- Region
- The Great Wall Terraces
- When
- mid-run
- Experience / loop
- ~180 (Game8 only)
- Amber / loop
- ~1,700 (Game8 only)
- Loop time
- not stated
洞の間内部
- Region
- Pilgrim’s Zone
- When
- Episode 4–7
- Experience / loop
- ~220 (Game8) / ~230 (kamigame)
- Amber / loop
- ~1,500 (both agree)
- Loop time
- ~45 s (kamigame) / under 1 min (Game8)
ヌシの巣前
- Region
- Mount Hiei Zone
- When
- late
- Experience / loop
- ~230 (Game8 only)
- Amber / loop
- ~3,000 (Game8 only)
- Loop time
- not stated
クレーター周辺
- Region
- Crater Zone
- When
- Episode 8 onward
- Experience / loop
- ~2,600 (both agree)
- Amber / loop
- 375 (Game8) / ~150 (kamigame)
- Loop time
- ~1–1.5 min (both)
What is still unpublished
The wiki figures above are per loop, not per kill: no source we hold gives an experience-per-kill or amber-per-kill number, so none of these routes can be compared against a loop you build yourself. No source states how many enemies a loop contains, at what character level its figures were taken, or whether the experience award scales with level — which would make every number in that table true only near whatever level the writer was. Nobody has tested whether the respawn set is fixed or partly random beyond one creator saying it is “slightly random every time”, nobody has reproduced either wiki independently, and nobody has checked whether any of this survives a patch. The three creator camps remain non-comparable with each other for the same reason as before: three different points in a run against three different enemy sets. “Which is best” is answerable now only in the wikis’ own terms, and only for the four camps they cover.